How to use GPU of MX150 with Tensorflow 1.8 CUDA 9.2 (Phase 2: CUDA and cuDNN installation)
Reading Time: 5 minutes
In the serie “How to use GPU with Tensorflow 1.8 and CUDA 9.2”, we are now in the second phase. This step is related to the installation and the configuration of the library CUDA 9.2, the library CUDNN and CUPTI to prepare the laptop for the compilation of Tensorflow 1.8. We also check if the library is correctly installed by using the samples available in the package of CUDA.
The main attention point in this phase is the driver of NVIDIA freshly installed in the previous phase. During the installation of the CUDA library it’s important to prevent the installer to reinstall the driver because this could lead to a unstable system. So, we need to be attentive to this aspect.
Step 1: Download the required packages on NVIDIA Web Site and the required packages in the Ubuntu Repository
For the compilation of Tensorflow 1.8, we need the following packages to be download ed on NVIDIA web site:
- CUDA 9.2 : When you click on the url: https://developer.nvidia.com/cuda-downloads?target_os=Linux&target_arch=x86_64&target_distro=Ubuntu&target_version=1710&target_type=runfilelocal
You obtain the following page:
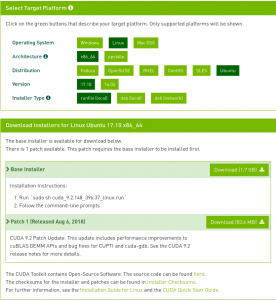
Select Linux -> x86_64 –> Ubuntu –> 17.04 –> runfile (local) and dowload the file. Why? Because it’s better to execute the script with different parameters to be sure that the driver is not reinstalled (example via deb (local)) which will cause a black screen at the end (I’ve really lived it 🙂 ). You also need to download the following patch https://developer.nvidia.com/compute/cuda/9.2/Prod2/patches/1/cuda_9.2.148.1_linux. This update includes performance improvements to cuBLAS GEMM APIs and bug fixes for CUPTI and cuda-gdb.
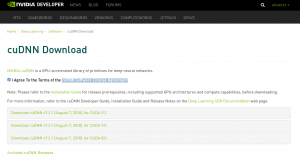
- CUDNN 7.1.4: when you click on the following URL: https://developer.nvidia.com/rdp/cudnn-download#a-collapse714-92, you need to authenticate by clicking on the join button

Select your preferred Social network or create an account. This is required to download the library CUDNN. When you are logged, you need to accept the terms of the cuDNN Software License Agreement, you access to the download page of CUDNN. Click on Download cuDNN v7.2.1 (August 7, 2018), for CUDA 9.2 to download the cuDNN for CUDA 9.2.
This is the cuDNN library which will create the link between the CUDA 9.2 library and the Tensorflow 1.8
- Last package to download, the library NCCL, when you click on this URL and agree the terms and conditions, you obtain the following page:
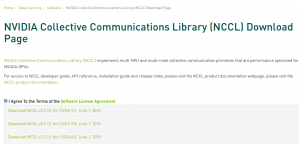
This is the NCCL library, select the version for CUDA 9.2
Step 2: Installation of CUDA 9.2
Before installing the library CUDA, you firstly need four Ubuntu packages:
apt-get install freeglut3 freeglut3-dev libxi-dev libxmu
To refresh your mind:
- libxi: X11 Input extension library.
- libxmu:X11 miscellaneous utility library.
- freeglut: This library is a free-software/open-source alternative to the OpenGL Utility Toolkit (GLUT) library. GLUT was originally written by Mark Kilgard to support the sample programs in the second edition OpenGL ‘RedBook’. Since then, GLUT has been used in a wide variety of practical applications because it is simple, widely available and highly portable.
💡 Attention point: Seeing that we used a customized approach for the installation of the NVIDIA driver on the Ubuntu, this is important to not reinstall the driver. So, if you execute the script ./cuda_9.2.148_396.37_linux.run (after of course chmod a+x) ; after the acceptation of the terms and conditions, he will ask you if you want to install the driver, if the answer is no, it will make an error due to an unexpected driver. If you install the driver, you have a problem (black screen) because this is not the correct method to install the NVIDIA driver on Ubuntu.
To correctly install CUDA without the driver you need to use :
- the option –-toolkit: to install CUDA toolkit.
- the option –samples : to install the CUDA Samples.
The following flags must be used with –silent option. The –silent option performs an installation with no further user-input and minimal command-line output based on the options provided below. Using this option implies acceptance of the EULA. .
./cuda_9.2.148_396.37_linux.run --silent --toolkit --samples
I invite you to use the option –h to see the other option available for this package.
Once the installation is done, you need to make visible the library by updating the environment variable LD_LIBRARY_PATH. To avoid reconfigure it for each new session, the best approach is to update your $HOME/.bashrc file which is executed for each new session.
export LD_LIBRARY_PATH=/usr/local/cuda/lib64:/usr/local/cuda/lib:/usr/local/cuda/extras/CUPTI/lib64:$LD_LIBRARY_PATH
Now, we need to validate if CUDA is correctly installed. For this, we will test the CUDA samples. Go to the directory where the CUDA samples are installed : Default is $HOME/NVIDIA_CUDA-9.2_Samples and execute the make command (if you have an error, you need to install make with an apt-get install)
make
When the compilation is made, you can execute the samples to see if the CUDA libraries are used. Here is a short video showing the expected results
On the right windows, I execute every second a nvidia_smi with the command watch -n 5 nvidia_smi. The interesting counter is called “Volatile GPU utilisation” which gives the % of GPU usage. With the particules program, you reach around 100% for the oceanfft, you reach around 35 %.
So, this video proves that CUDA is correctly installed, let’s now installed the cuDNN library which will make the link between the CUDA library and TensorFlow.
Step 3 : Installation of cuDNN library.
In the step 1, we downloaded the cuDNN library. During the step 3, we will decompress the archive and copy the contain in the CUDA folders (include and lib64).
tar xvfz cudnn-9.2-linux-x64-v7.1.tgz
cd cuda
cp -R * /usr/local/cuda
💡 Attention point: don’t copy folder by folder but copy all directories +file .txt NVIDIA_SLA_cuDNN_Support.txt which is checked during the compilation of Tensorflow (crasy isn’t it? 😯 ). I suppose that the reason is related to the license agreement for NVidia cuDNN stored in a text file.
Step 4 : Installation of NCCL library.
In the step 1, we downloaded the NCCL library. For the step 4, we will decompress the archive and copy the contain of this folder in the CUDA folders (include and lib64 folders)
tar xvf nccl_2.2.13-1+cuda9.2_x86_64.txz
cd nccl_2.2.13-1+cuda9.2_x86_64/
cp -R *  /usr/local/cuda/include
Conclusion:
Good ! we have now the CUDA and cuDNN libraries correctly installed, The next step is the compilation of the Tensorflow 1.8.
So, let’s start now with the Phase 3!
I will recommend you to reserve minimum 3 hours, one or two liters of coffee and a fresh mind (no party the day before) because this will be really demanding 😉
Feel free to give comments or ask questions and I will try to answer you.
If you find this post valuable, Rate it ! This helps me to improve it. For comments, you need to register with your LinkedIn account.
 (2 votes, average: 5.00 out of 5)
References:
When I write an article, I always give the references I used because I believe in intellectual property and I know how many times you need to write a valuable article:
Hi, Thank you for giving attribution to my posts. I’m always happy to share what I’ve discovered or worked out. Your posts look very good, keep up the good work!
Best wishes – Don (from Puget Systems)